AZURE ADMINISTRATOR ASSOCIATE (AZ-104)
AZURE ADMINISTRATOR ASSOCIATE
AZ- 104

Welcome to Azure AZ-104 Certification Course:
Setting up Azure free account:
Creating the Free Azure account
Go to https://azure.microsoft.com/free.
Click on “Start for free” button.
You will be redirected to a sign-in form. You need the Microsoft account.
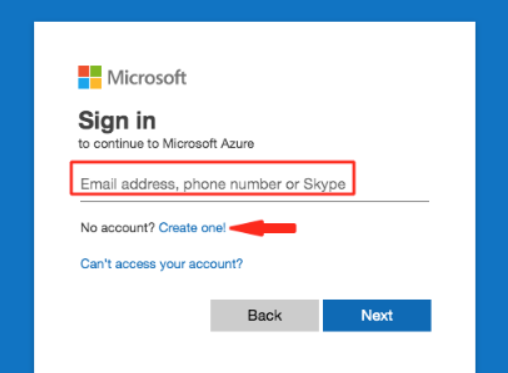
After your successful authorization you will be redirected to Identity verification by card form

click sign up and your Azure account is created
For First Azure registration , Microsoft free credits and services
Microsoft will give you €170 or $200 free credit for the duration of 30 days . When your first month ends (30 Days), the credit expires and you will be asked to choose one of the available subscriptions.
It provides 12 months of popular services for free.
It gives 25 services independently for free. Offer might differ in different regions.
Each Microsoft account or Microsoft service is associated with the Azure Active Directory (AAD). AAD is Microsoft’s cloud-based identity and access management service which ends with onmicrosoft.com suffix. You can see the name of your AAD after clicking your name at top right corner and then click at switch directory link. ADD Will create a directory (Tenant) for your id.
Once you create a Azure account create a budget :
Go to subscription > Go to budget > Enter unique name


Give the threshold value as 100 %
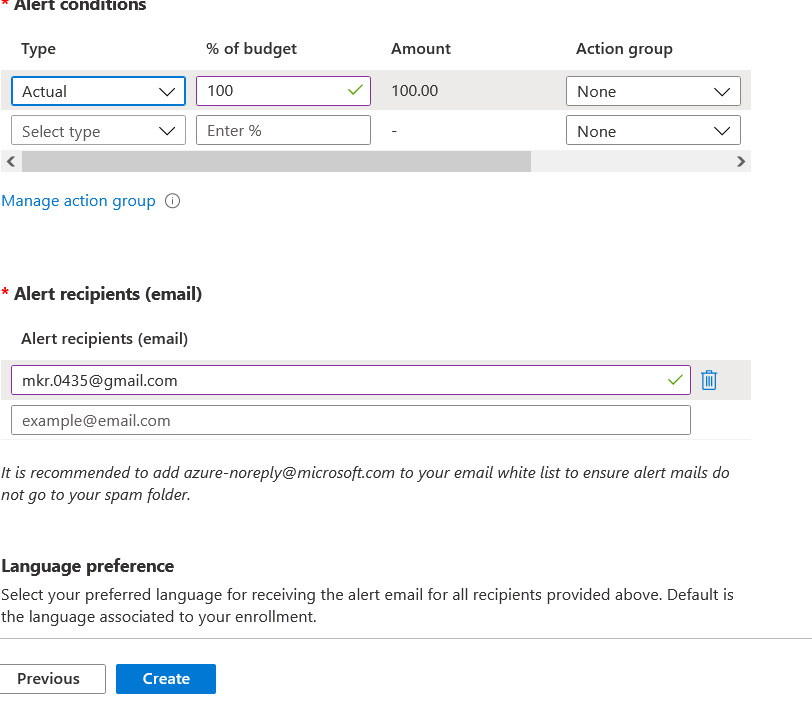
Provide the recipients email id to get notified once the budget reached the 100% amount
Azure Core Services:
Virtual Machines
Virtual Networking
Storage
Virtual Machines : Linux or Windows:
You can deploy Linux or Windows virtual machines and connect them using RDP /SSH .
Windows : RDP , Linux : SSH
You can install third party software , patches , updates, load banacers etc.
VMs can be deployed through Azure batch,VM scale sets, Azure kubernetes services , Service fabric
APP Servcies: . Net, Core.Net, Java, ruby etc
Azure Networking :
Virtual Network
Expresssroute _: WAN Faster way of encrypted transmission (high cost)
VPN Gateway – VPN encrypted Gateway
Azure DNS: Public/ Private Domain Name
Peering: Network Connection between one region to other region
Bastion: Allows RDP without RDP port/ software
Network Security :
Network Security group (NSG) – Access control
Azure Private link
Distributed Denial of Service( DDOS)
Azure Firewall
Web App Firewall (WAF)
Virtual End Points
Network Delivery
Content Delivery Network (CDN)
Azure Storage :
Managed Disk storage are managed by Microsoft Azure and you don't need any storage account while created new disk.
Unmanaged Disk storage, you must create a storage account in resources to hold the disks (VHD files) for your Virtual Machines
You can create Azure storage upto 5PB . Each blobs ,queues,tables,fiels replicates local to global ( 2 copies of files).
There are 3 types of storage tyres: Hot , Cool , Archive
Hot: Most recent using /usable files
Cool: Rarely usable files
Archive: The files that can be archived
DB’s Used: MangoDB, Maria DB, SQL DB…
MicroServices: Microservices are built in Azure application that can be used as a template.
Monitoring Services :
Network Watcher
Expressroute Monitoring
Azure Monitoring
Programming and Scripting in Azure
There are 2 types of scripting being used in Azure:
Powershell
Bash /CLI
Powershell: Example:
Get-AzVm
New-AzVm
Get-AzVirtualNetwork
New-AzVirtualNetwork
Remove-AzVirtualNetwork
BASH /CLI Commands Example:
az vm list
az vm create
az vm delete
az keyvault create
az keyvault delete
az network vnet list
az network vnet create
az network vnet delete
az network vnet subnet list
az network vnet subnet create
az network vnet subnet delete
You can use azure cloud shell using:
https://portal.azure.com/#cloudshell/
(or) Go to Azure portal and select Cloud Shell.
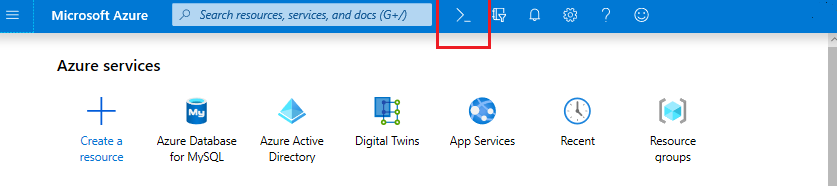
Select Bash or PowerShell.

From the drop-down switch to Bash/ Powershell

Manage Azure Active Directory:
AD Licencing:
Free Licencing
Office 365 apps
Premium P1
Premium P2
https://docs.microsoft.com/en-in/azure/active-directory/authentication/concept-mfa-licensing#available-versions-of-azure-ad-multi-factor-authentication
Every Azure AD has a unique tenant. When you create an Azure account it will automatically create a tenant for you. Tenant refers to your organisation name or public domain.Ex: xyz.example.com. If Domain not specified it will assigned as example.onmicrosoft.com
More than one account can be owner in tenant
More than one subscription can be used for a tenant
AD Accounts/ Users:
The AD account user can be individuals mail id /MFA
Application Managed identity : It can be a program or service
Creating an AD in Azure :
Azure AD is a sign- in directory for On-premises AD
====🡺 ==🡺

Usercomputer Azure AD On-Premises Active Directory
Go to Home > Click on Azure Active Directory from the left menu items>Manage Tenants>
>Click on Create>Azure Active Directory>On configuration tab> Provide Organisation Name,Domain Name, Region >Create
Switch between Azure AD tenants:
Go to Azure AD > Manage Tenants>Select the AD account you wish to switch and click on switch tenants.
Add Custom Domain:
If you have a custom domain you can change your custom domain as your Azure Default domain as a primary domain.
Go to Azure AD >> Click on Custom Domain Names from the left menu items>Add Custom Domain(EX:xyz.com)
Once you create a custom domain you will get TXT and MX DNS records. You will need to register the TXT or MX record in to Domain register such as namecheap.com or godaddy.com. Once it is successfully registered the custom name status would be verified.
Go to verified custom Domain and click on Make Primary. Just to validate your custom domain you created go to AD and create a user .Now you should be able to see your new custom domain along with AD default directory.
Azure AD Administrative Units:
It is a kind of providing specified permissions to selected set of people in your organisation and restricts other access.
Go to Azure AD >> Click Administrative Units from the left menu items>Click on Add>
In Properties tab >Provide Administrative name ad Description
In Assign roles tab you can see the default Assigned roles to administrative tasks

Click on Create. You are done !!
Manage Azure AD Objects:
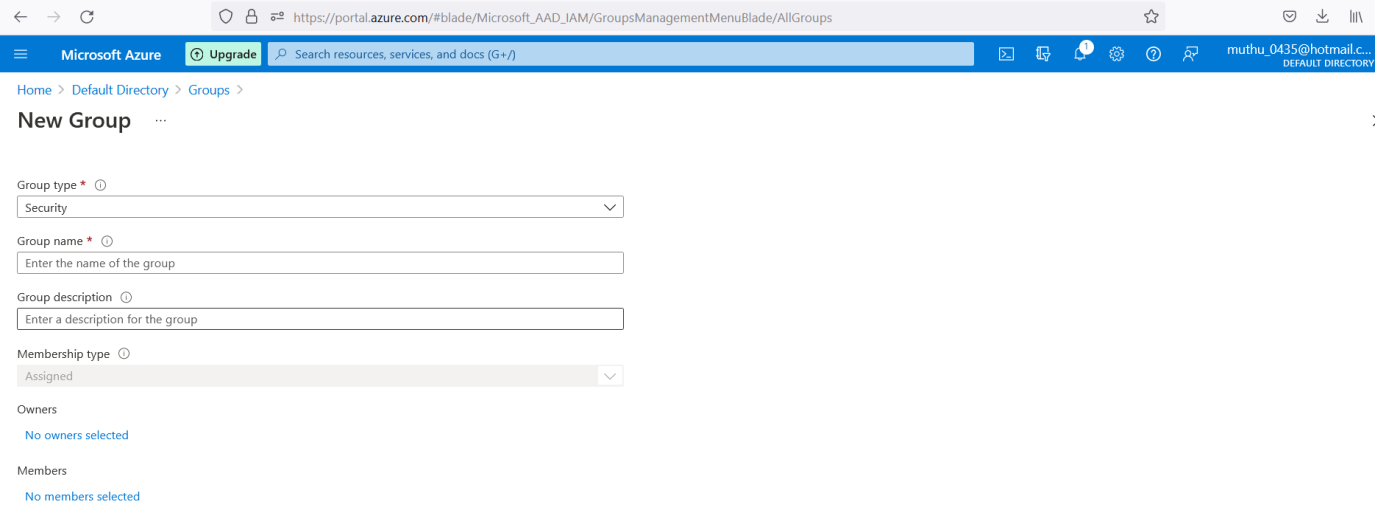
Creating Groups in AD : Go to Azure AD>Click on groups>New Group>select type Security>
Provide group name and description> Membership type: Assigned>Select owners and Members to the group and create.
Owners: AD users can be the owners to the groups
Members: Program / Service and the users can be the members to the groups
You can also select a membership type as Dynamic group
Dynamic Group is a rule based group to create with a display name:
Example: If the display name prefix with “Muthu” it will add all user account starting with prefix “Muthu” will get automatically added to the group.
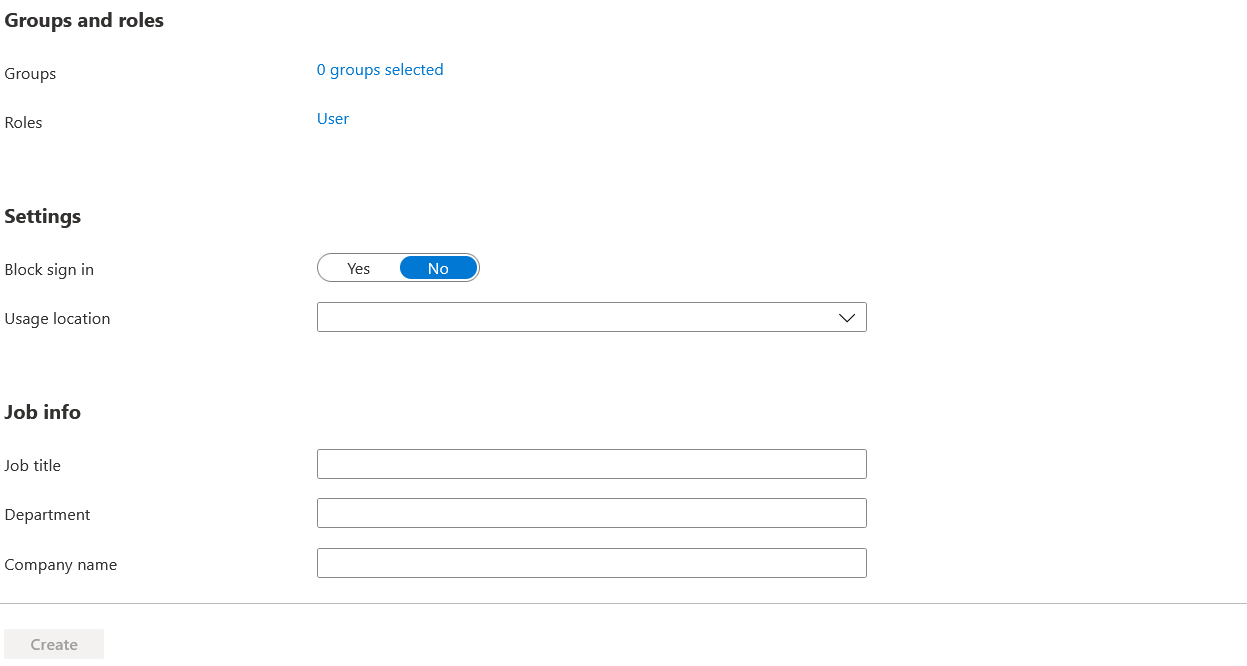
Creating New User in AD:
Go to Azure AD> Click on users> New user> Fill up the details
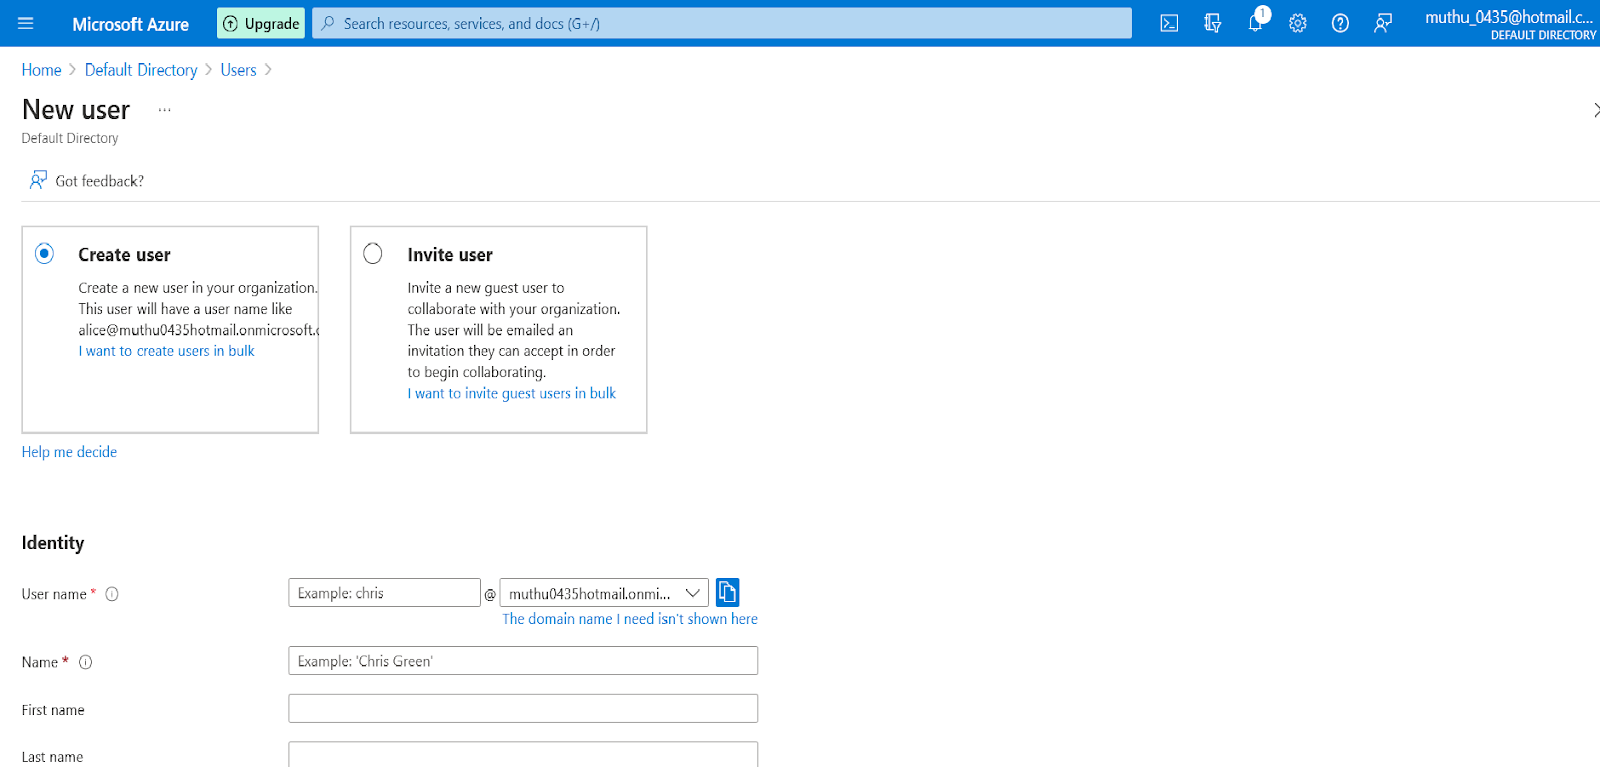
Provide the user role and groups you want to add the user to. Click on create
Inviting external user to AD tenant account:
Go to Azure AD> Users> New Guest User>You will be landed to below webpage portal.

Send an invite to new user and provide user mail id and post a message. Once the user accepts the invite he would be added to the AD tenant.
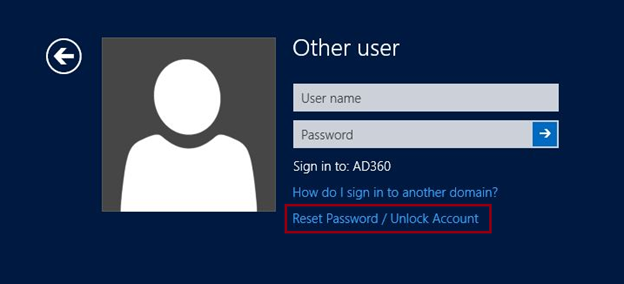
Self-Service password reset:
The self-service password reset requires a premium account subscription.
Enable self-service password reset for a group of Azure AD users
Set up authentication methods and registration options
Test the SSPR process as a user
Self –Service password reset for groups:

Self-Service authentication methods for users:
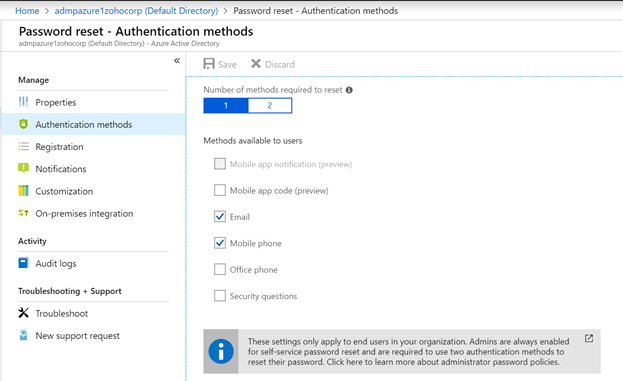
Once you enabled self-service password reset option, users can access the Azure portal through a web browser and easily reset their Azure AD password

Manage Devices to AD:
You can connect your personal device with Azure AD .Here is an example given
How to connect your windows 10 PC to azure AD.
In window10 , you have an option “Access Work or School” >Click on connect +> add you Microsoft tenant user account and password.
Once your account successfully verified , the device will be added to you Azure tenant.
Go to Azure AD>Devices> All Devices> Verify your device is been added to AD.
You can enable /Disable any time from AD , until you disconnect or remove the added AD account from your device.
Bulk Upload/ Download in Azure AD:
Azure provide an option to bulk upload /download the users to/ from AD .
Go to AD> Users> Click on Bulk operations

Here you can download the given template and do the required operations.
ROLE BASED ACCESS CONTROL (RBAC):
RBAC is providing access to the computer or resources based on the roles of users in the organisation.
Go to Resource groups>Select the resource group >click on Access control ( IAM)>In right corner select add role assignment to assign role> select the role > add members>review and assign.
Assigning roles to the users:
Go to Azure AD> Roles and Administrators> Select the role you want to grant to the user from the list>Go to role description and end …>Click on assignments> Add Assignments>Select the user and add
To verify Go to Azure AD> Select the user and check the Assigned roles
Creating Custom Role:
Go to resource group > Select the resource group >click on Access control ( IAM)>at the right bottom click on create custom role
For creating custom role you can clone from any existing role or create from the scratch .
Once you created a custom role . Go to resource group > Select the resource group >click on Access control ( IAM)> Roles> you can view your new custom role listed here.
Select the custom role>View> select the assignments(3rd Tab)>Click on Add Assignments>
Add Members / Groups and assign
Manage Subscriptions and Governance
Accounts
Subscriptions
Resource Groups
Accounts : Azure AD account is an individual account /MFA
Subscriptions : Free, Pay- As- You- Go, Enterprise agreements
Resource Groups : Resource groups are bunch of resources
Expected resources : VM,Webapp, storage,..
Unexpected(Autocreated) Resources : Public Ip address,Network interface card,NSG
Subscription Dashboard:
Goto Subscriptions>Select Subscription>Cost Analysis>

In this page you can view which is consuming the more or less cost in your subscription.
Assign Administrator to Subscription:
Goto Subscriptions>Select Subscription>Access Control (IAM)> Add Role assignment>
Here you can add role to user or groups in AD.
Cost center and tagging:
Goto Cost Management +Billing>Cost Management> Cost Analysis>

Resource Groups and Locks:
Resource lock provides administrators to prevent deletion or changing the resources. It will also restrict access to resources for all users.
Go to Resource groups>Locks>Click on add to create a lock for resources

Azure Policy:
You can assign a Azure policy as per your company standard. Example: If your company instructed to create VM with limited parameters due to cost constraint. You can set as a policy to restrict user to create a VM with limited parameter set (VM Size)
Go to Policy> Click on Assignments>Assign Policy>Fill in the details as mentioned below and create one.

One of the examples below:

Move Resources between regions:
Go to Resource group > Select resource >Click on move to another resource group>
Once it is successfully move to another resource group . Goto resource >Properties >Validate the resource ID.
Subscriptions and Management:
Change the name of the subscription
Goto Management group>Create and add subscription .
Create and Configure Storage Accounts:
To create a storage account
Go to Storage accounts> create>

Fillup Subscription,Resource group, Storage Name,region
Performance: Standard _ General purposev2
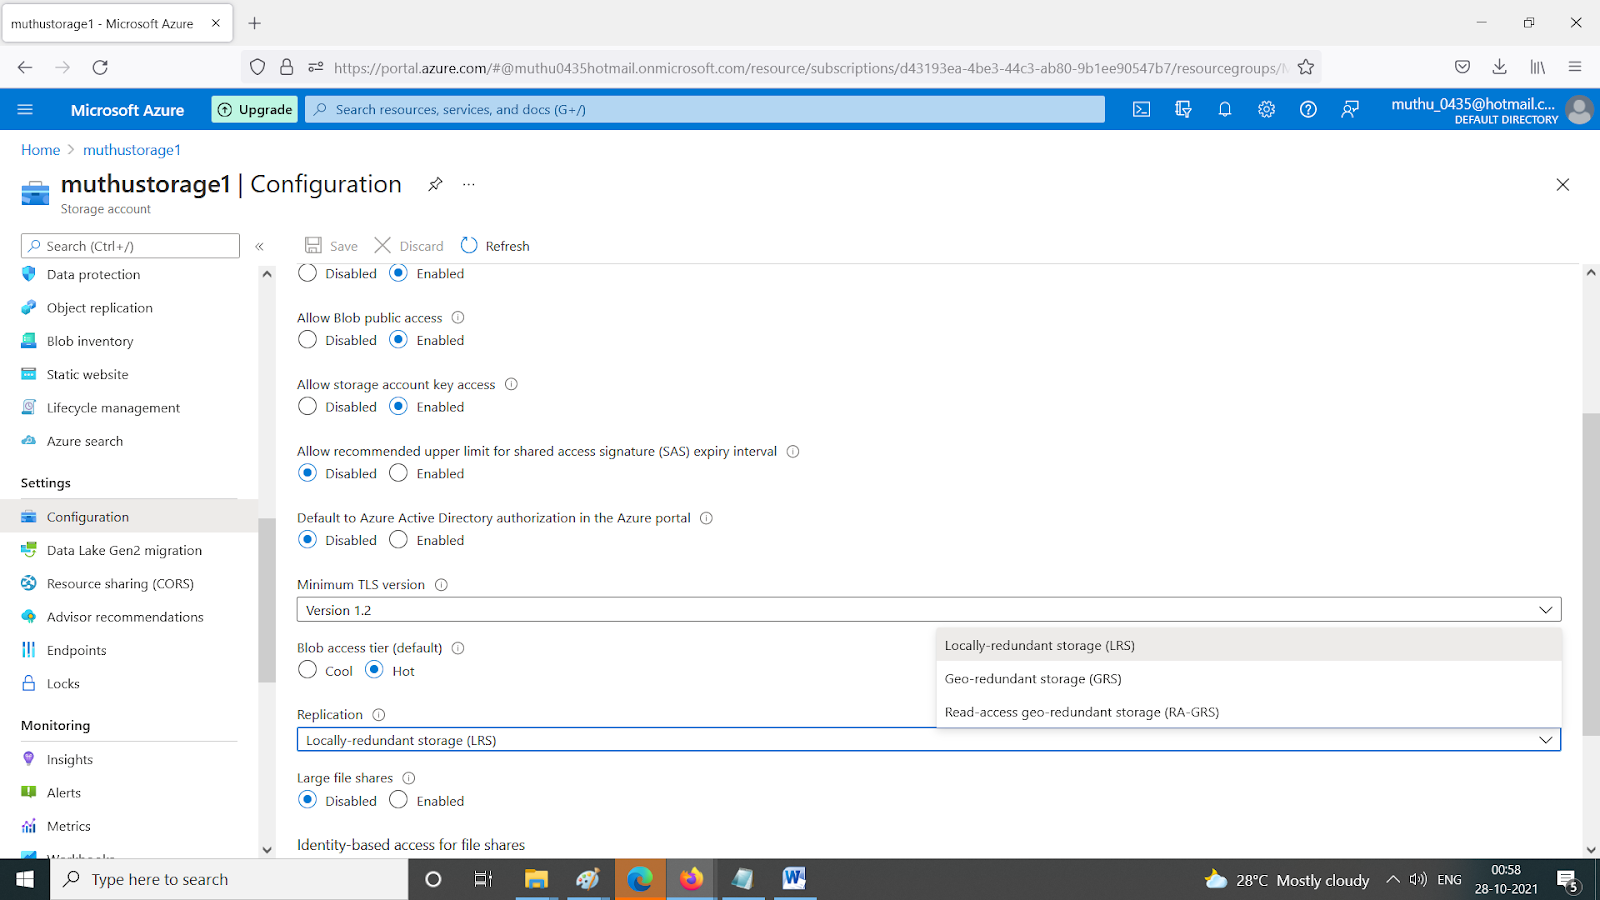
Redandancy :
Geo ( Will have secondary storage /Copy of storage)
LRS : Will have 2 additional copies (locally) same region
GRS: Will have 6 Copies of your files
ZRS: Will have a copy in separate data centre
GZone- Combination of GRS and ZRS
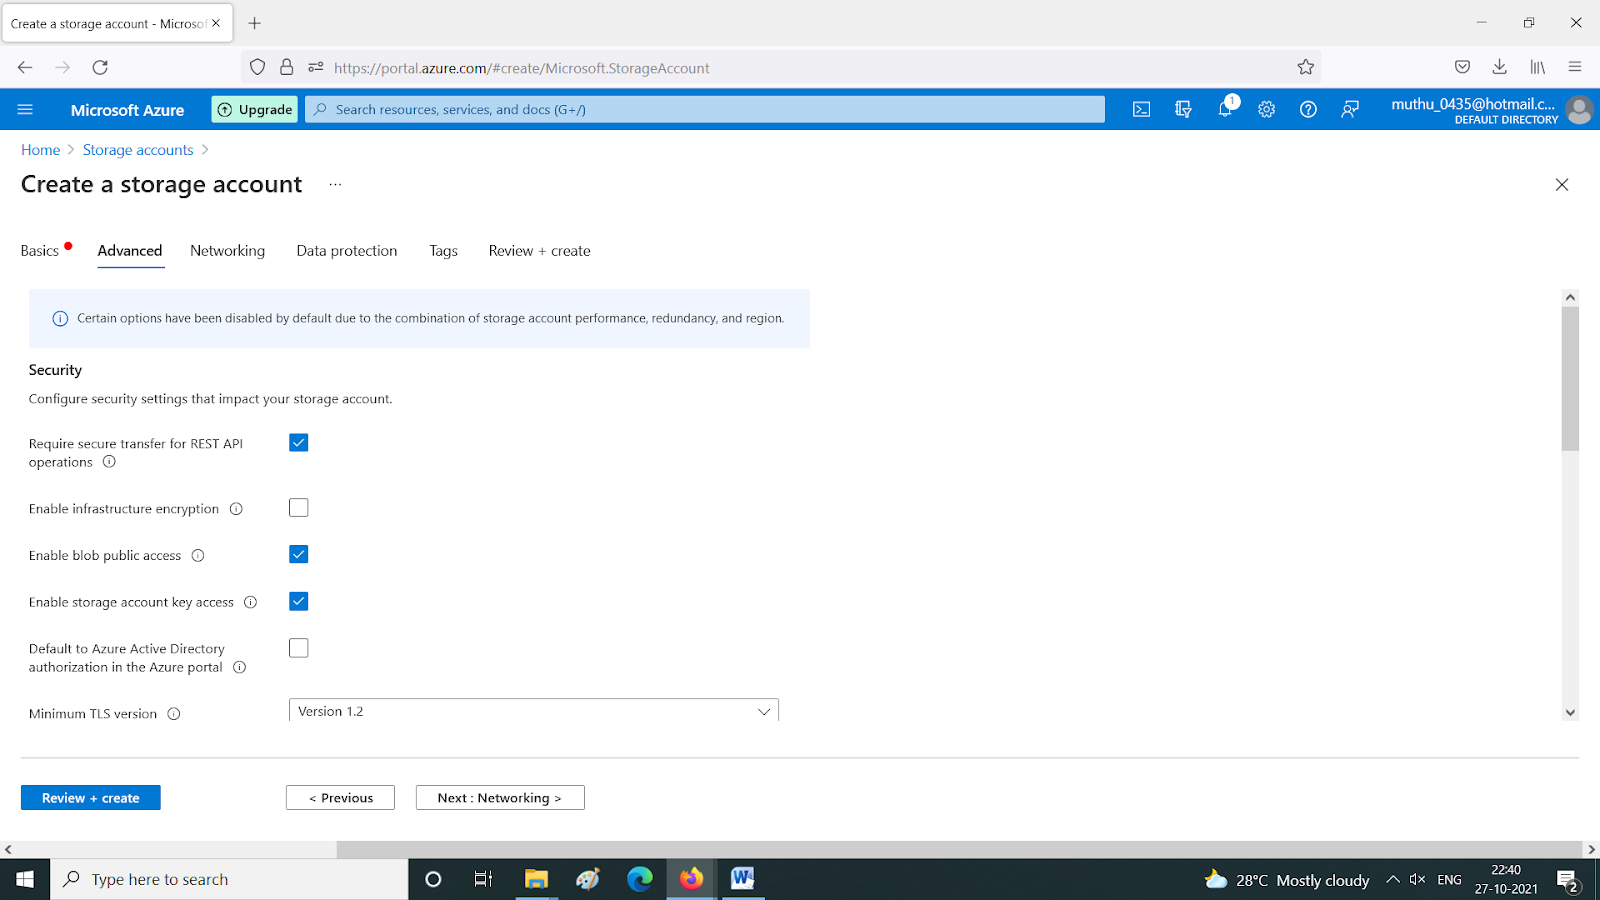
Require secure transfer for REST API operations : https enabled secure transfer
Enable infrastructure encryption : Double Encryption
Enable blob public access: Providing public access to storage
Enable storage account key access: Key based access
Select latest TLS version
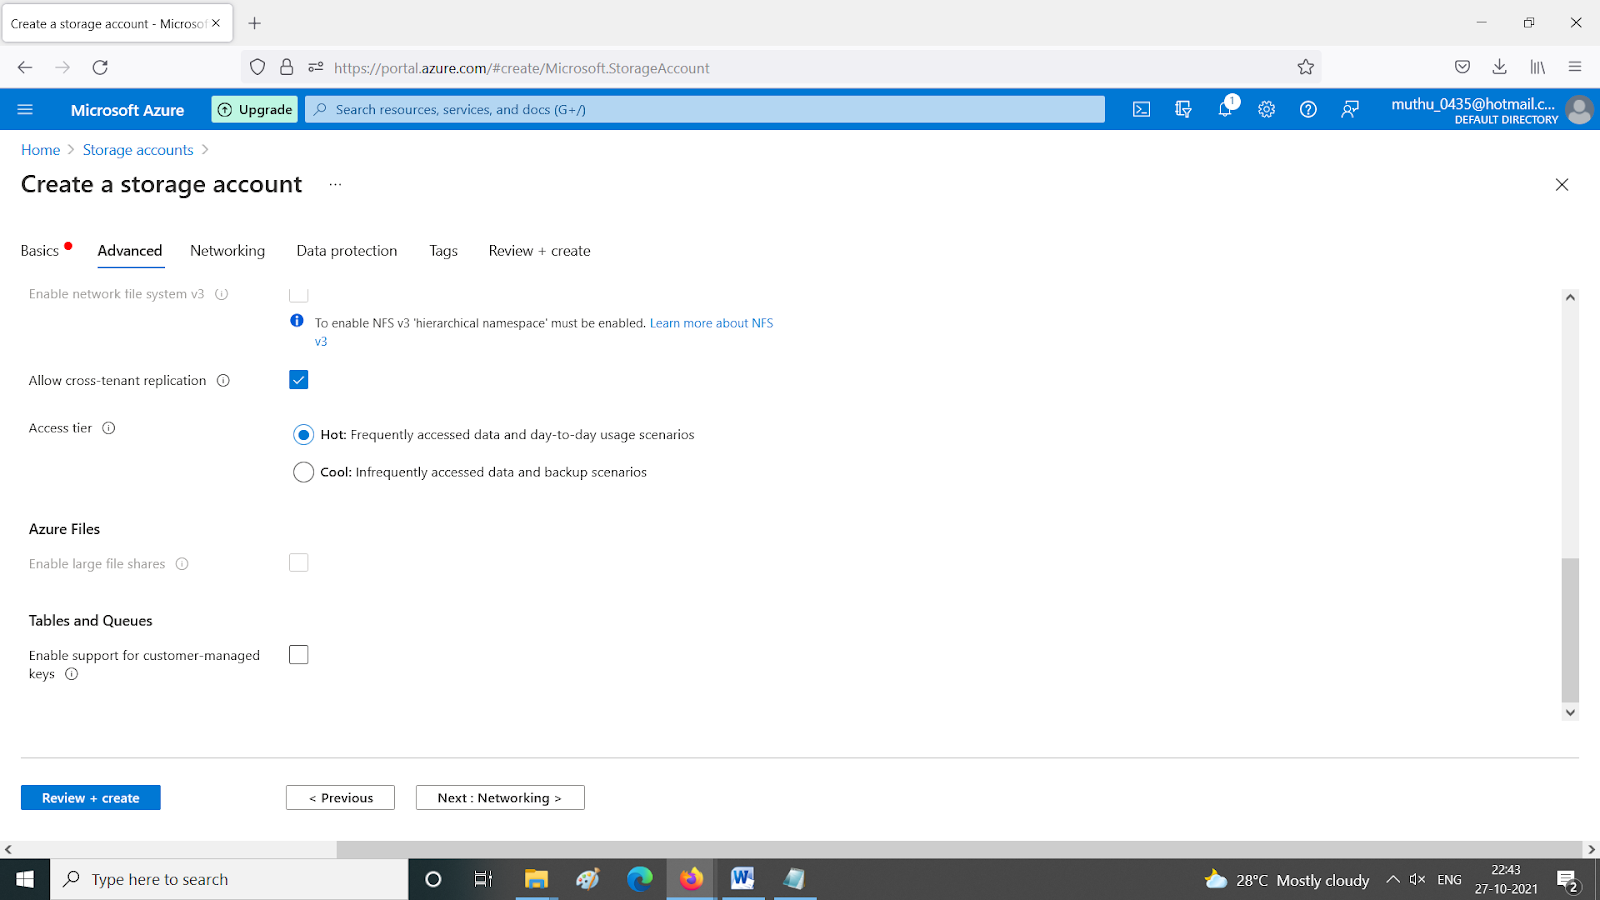
Select tier Hot or cool

Networking tab >Public end point for all networks
Network Routing>Microsoft network routing
Microsoft network routing :Microsoft Global network (region to region) paid service
Internet routing: Internet routing through router to router (free service) not recommended

Provide the retention policies in Data protection.Add tags if required and click on Review +create
Access Keys and SAS:
Goto Storage Account>Access Keys>Click on show keys.
You will have 2 keys . you can share the keys with your vendor who want to access your storage account since you have public endpoint. We can regenerate the key whenever needed.
Shared access signature :
Goto Storage Account>Shared access signature>


Configure the settings as mentioned above and >Click on generate SAS and connection string. You can share the SAS URL to access your storage account instead of sharing your keys.
Storage Explorer:
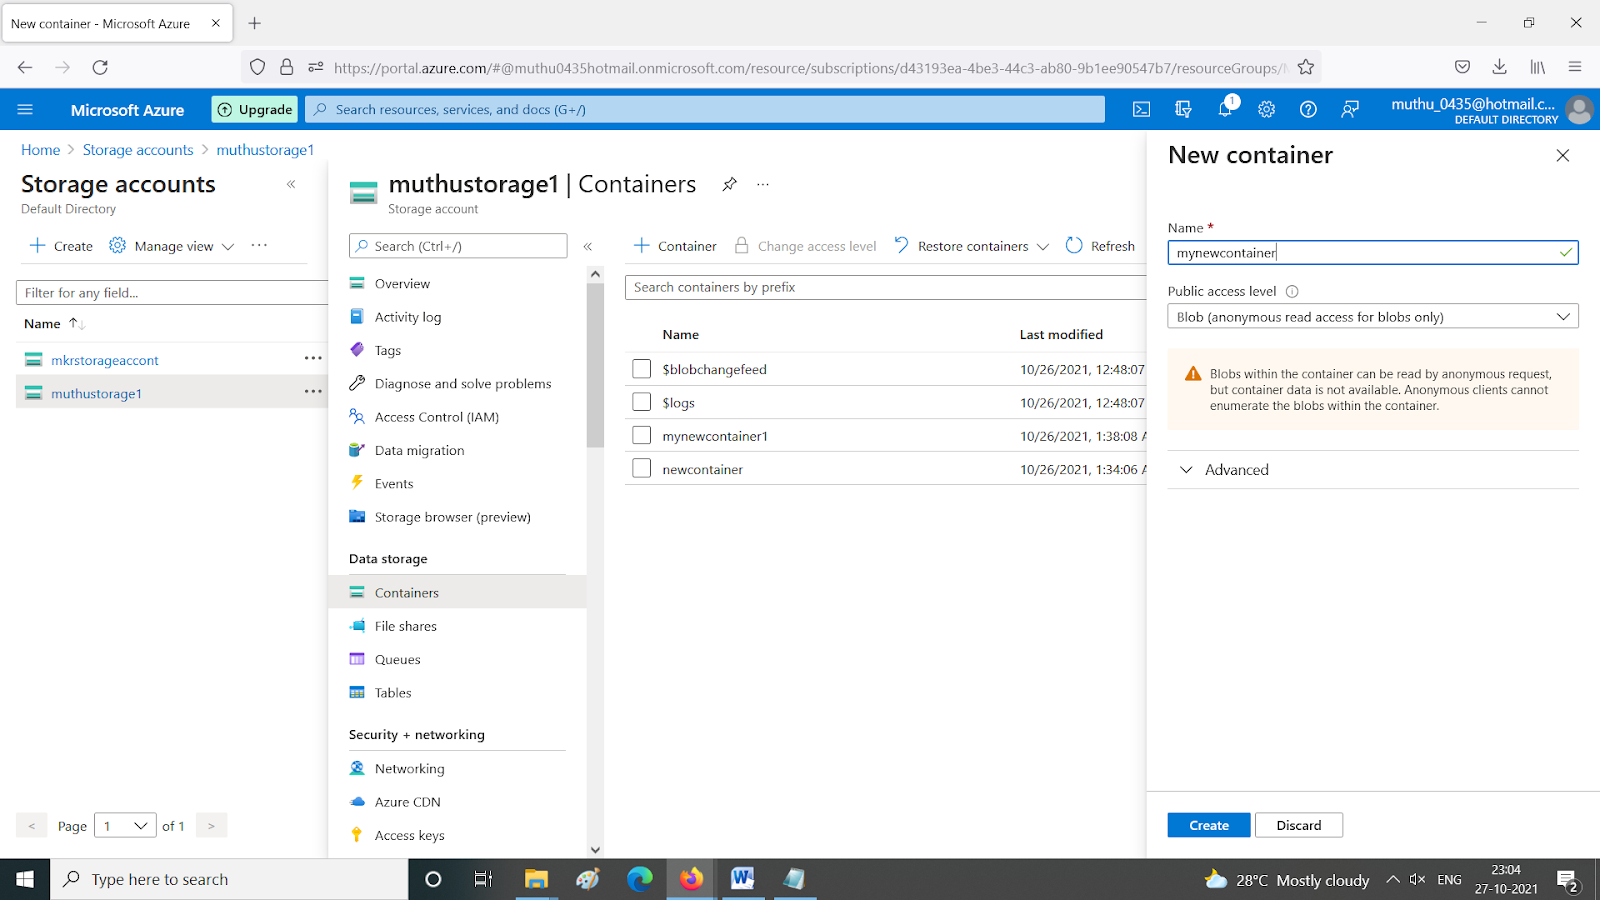
Goto Storage Account>Containers>+ Container>Select Blob (anonymous read access for blobs only)> Create
Once you create a container > Go to created container and upload a file from local machine>Select the uploaded file and Click on Generate SAS and right corner (…).
Share the blob SAS URL to access the file from public network.
Storage explore agent can be downloaded and used to the storage access view . However there is a web based storage explorer also available in Azure portal. You can create directory /files inside the containers.

Azure Log Analysis:
Go to storage account> Monitoring>

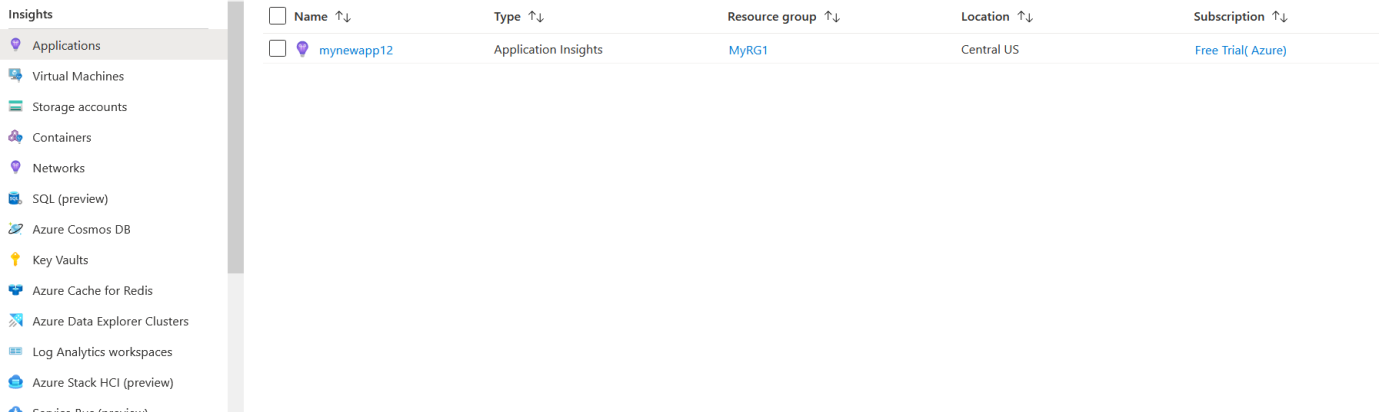
Insights
Alerts
Metrics
Workbooks
Diagnostic Settings
Logs Preview
Insights: It is a application performance monitoring tool. It will monitor your application availability, performance, failures, and usage by combining data from Application Insights SDKs with Azure Diagnostics data from your cloud services.
Alerts: You can set us alert rule to notify once the storage account reaches the max size or threshold level.
Metrics: To view the storage performance using graphical representation.
Workbooks: To view storage account logs
Diagnostic Settings: Add diagnostic setting to list of categories of platform logs and/or metrics that you want to collect from a resource.
Logs Preview: Azure managed predefined scripts or queries to get the storage logs
Redundant Storage :
Go to Storage account> Setting> configuration> Change the replication you wish
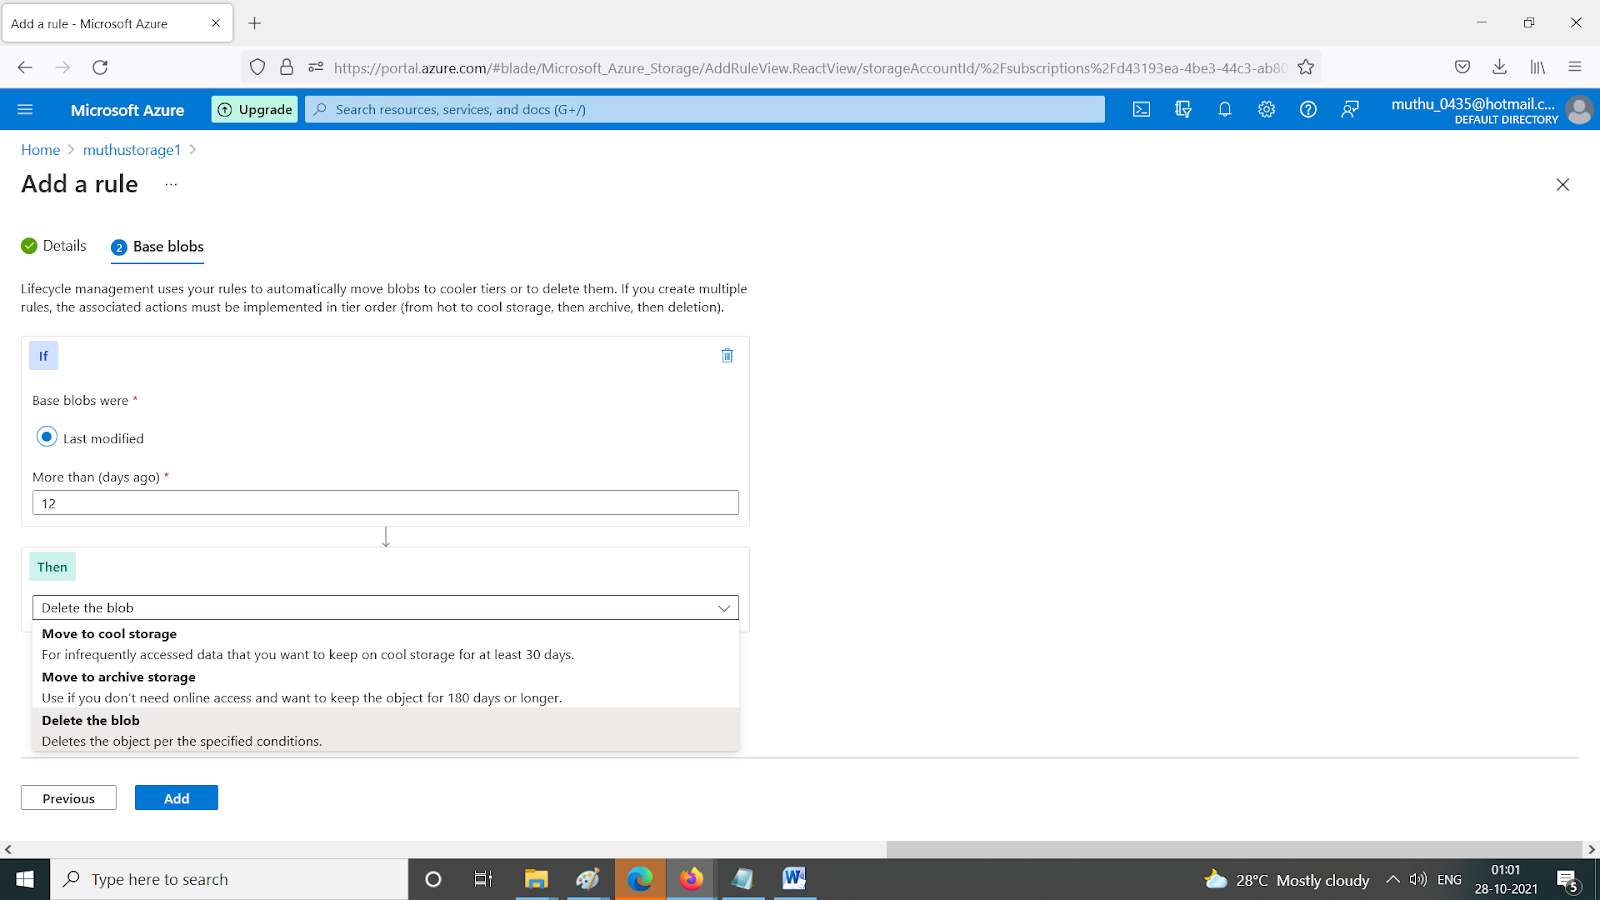
Life- Cycle Management:
Go to Storage account> Lifecycle management>Add a rule>add a condition based on modified time to move/ delete/ archive .
Object Replication:
Go to storage account>Object replication>Setup Replication rules> Provide source and destination.> Add filter and object parameters> Save and apply
Import and export data to Azure:
Moving Large Files:
Go to Home> Import/Export jobs>Create a job and provide the shipping courier name.
The Courier company will provide the empty Azure Data box to collect the data and courier to your Azure data center.
Blob Storage account:
Blob storage account will have media, images, other multimedia files,binary executable codes, text.
Go to storage account> Create a storage account with performance Standard type
Content Delivery Network (CDN):
The Azure Content Delivery Network is designed to send audio, video, apps, photos and other files to your customers faster and more reliably, using the servers closest to each user. It can be hosted in Azure or any other location.
Go to Home> CDN Profile> Create
It require Standard or Premium tier pricing . It will create a public URL to access the contents
Configure Azure Files:
Azure file Share:
Goto Home> Storage Accounts>Create a new storage
Go to Storage account >File Share>select type Hot or cool
Click on File Share >Connect>Map the drive letter and run the powershell script
Azure File Sync :
Go to Create Resource>Azure File Sync>Create
Go to newly created file sync group >Click on Sync Groups> Create Sync Group
Download and install Azure file sync agent on your local machine and register the server you want to sync. Synchronise with same sync group.
Troubleshooting Azure Sync :
Implement Azure Backup and Recovery
Azure Backup :
Go to Home> Create resource >Backup and Site recovery > Create
(Or ) Go to Home> Recovery Services vault.> Create
Goto Recovery services vault> Backup >Azure> File Share>Select Storage account>Select Fileshare to backup > Enable backup
Now Go to backup Items and check the backup item count in Azure file share

Now go to Backup infrastructure>Storage account> Check the backed up items

File Recovery from VM Backup:
Go to VM>Backup > Enable backup with Default settings
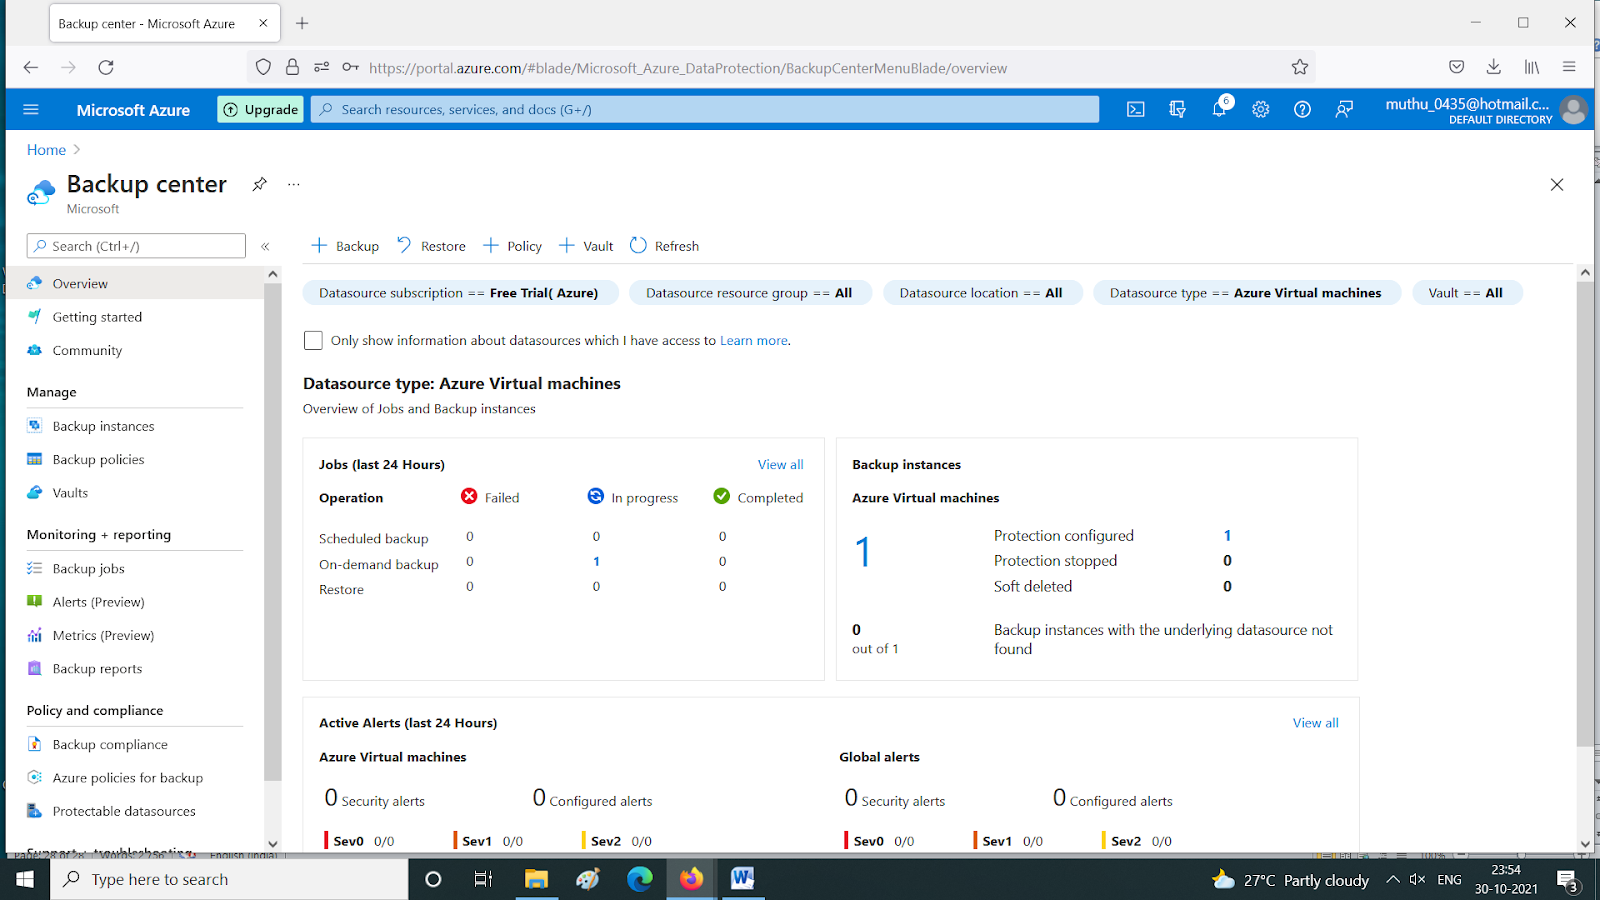
Once you enable backup> Click on backup to backup your VM
Go to Backup Center if the backup is on progress
Once the backup is completed , Go to backup> select site recovery> select recovery point >Download executable file>Mount the disk to recover file>Umonut disks.
On-Premises Backup:
Go to recovery services vault> select the vault>Backup>On premises >Select what you want to backup> Prepare infrastructure

Follow the instructions as mentioned below:

Backup Reports:
To Enable backup reports , Go to Recovery Services Vault>Select Vault> Diagnostic Setting >Add Diagnostic setting. Set a setting for log alaysis

Soft Delete for VM Backups:
You can enable soft delete, by keeping 14 days logs in Azure.On 15th day it will get auto delete. You can resume or recover VM from the backup before 14 days from the day of deletion . For Virtual Machine: Go to VM>Backup>Stop backup>
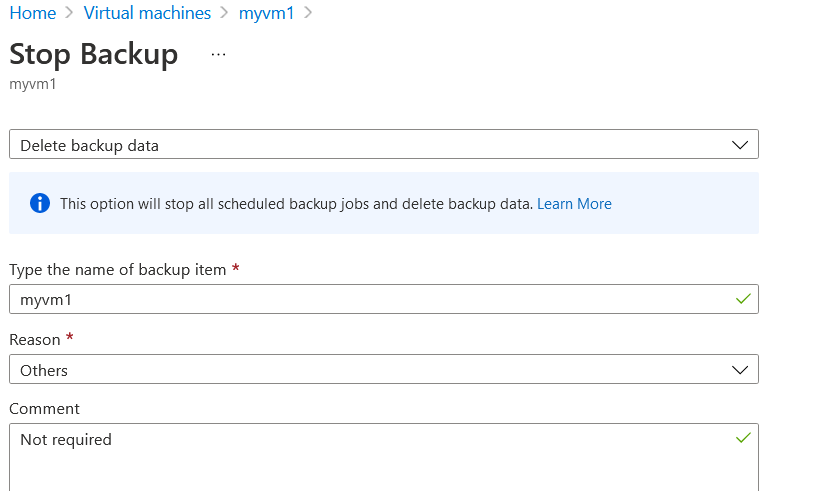
Now go to backup and select Undelete

You can also select Restore VM to recover the backup by specifying the date rage.

Azure Site Recovery:
It provides 99.95 SLA and High availability to the VM
Go to VM> Disaster Recovery >Target region>Advanced settings>
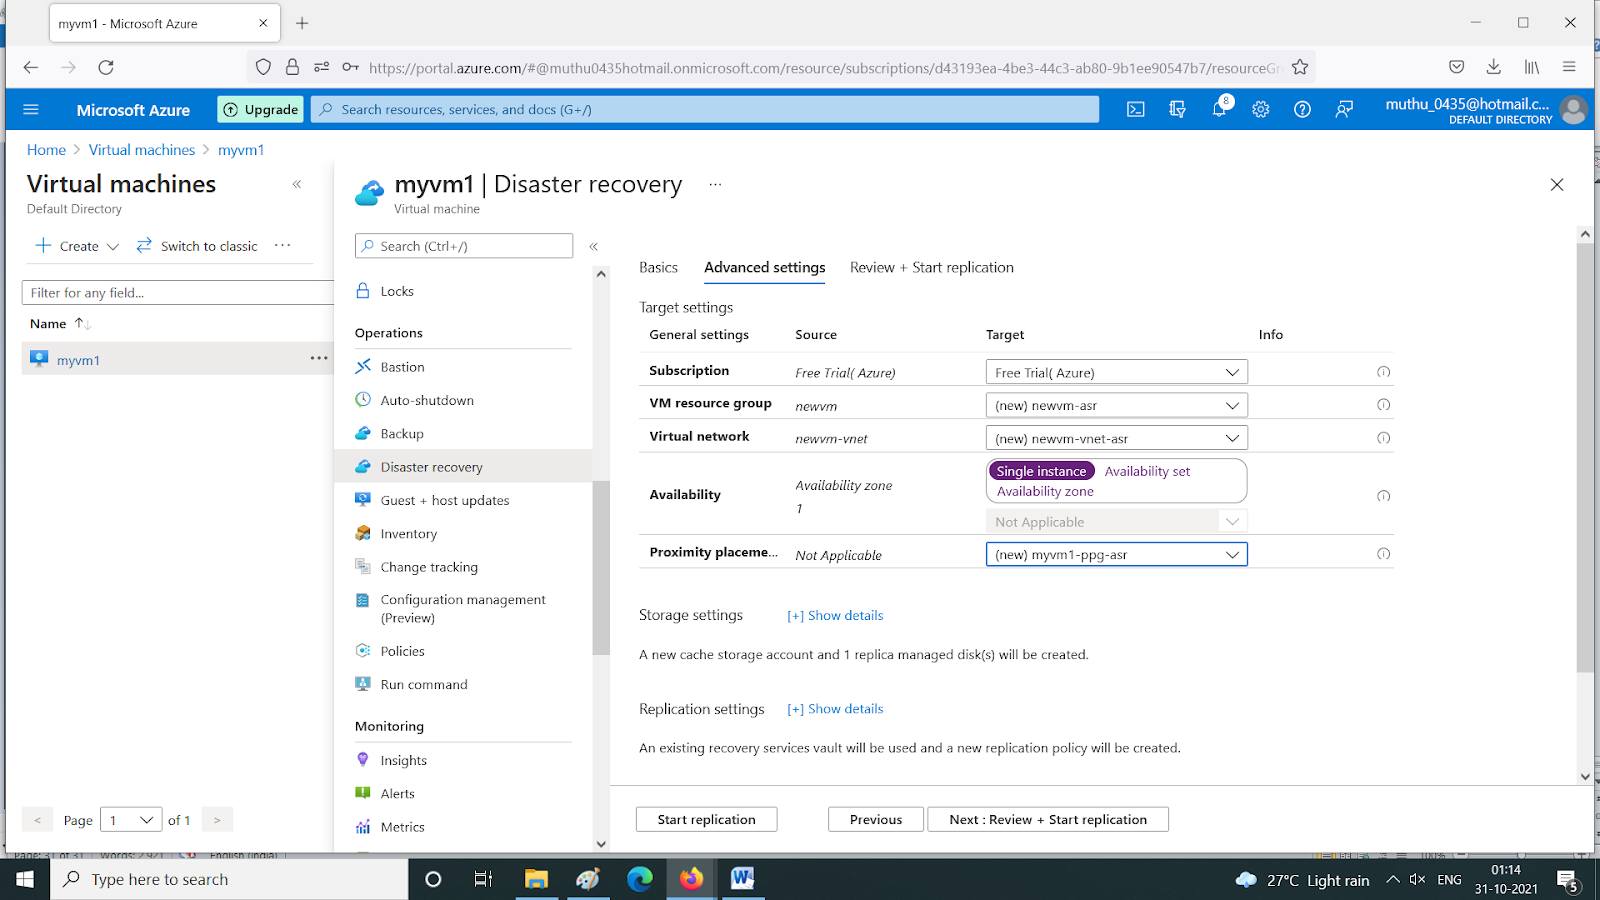
>Start Replication.
To check the progress of replication, Go to Recovery Services Vault>Select the service>Under protected Items>Replicated items> Check the VM Staus
ASR Test Failover:
Go to VM>Go to Disaster Recovery> Replicated items>Test Failover
Cleanup the test Failover once done
Azure Virtual Machines:
Create a VM:
Go to Create a Resource>Compute>Virtual Machine Create>
Azure spot Instance is based on pricing tag assigned to your VM. It is recommended for Low priority tasks.
Once the VM deployed successfully, Click on download the template.
Connect to a VM:
Go to VM> Select connect> RDP/SSH
Required to download putty for Linux and RDP file for Windows
Note: You can stop VM to dis-allocate the pubic IP address to save cost.
VM Monitoring:
Goto VM>Overview tab> Monitoring> Pin CPU>Go to Dashboard>Select CPU>Edit Custom settings
Goto VM>Diagnostic setting>Enable –guest level monitoring
Go to Performance counter tab>Enable CPU,Memory ,Disk monitoring
Go to Logs Tab> Enable Critical ,Error , Warning
Go to Crash Dump> Enable
Go to Sinks> Diagnostic logs for application data on VM
Agent> Agent can be removed/ Delete
Insight Monitoring:
Go to VM>Insights> Enable
VM Custom Script Extension:
Go to VM> Extension> Add the custom extension you wish> Create
Bastion Service:
Bastion service provides secure and seamless RDP or SSH connections to VM’s in your virtual network.
Go to VM> Bastion> Create Azure Bastion using Defaults
Virtual Machine Scale Sets:
Scaleset is a Azure loadbalaces to assign resources based on VM load
Goto Create a resource> Search Virtual machine Scaleset>Create
Proceed with Default Settings. Enable application Health in Health tab.
Automatic Repair policy will delete the corrupted VM and recreate a new one
Enabling VM Scale set is free of cost , you can enable it for all running VM’s
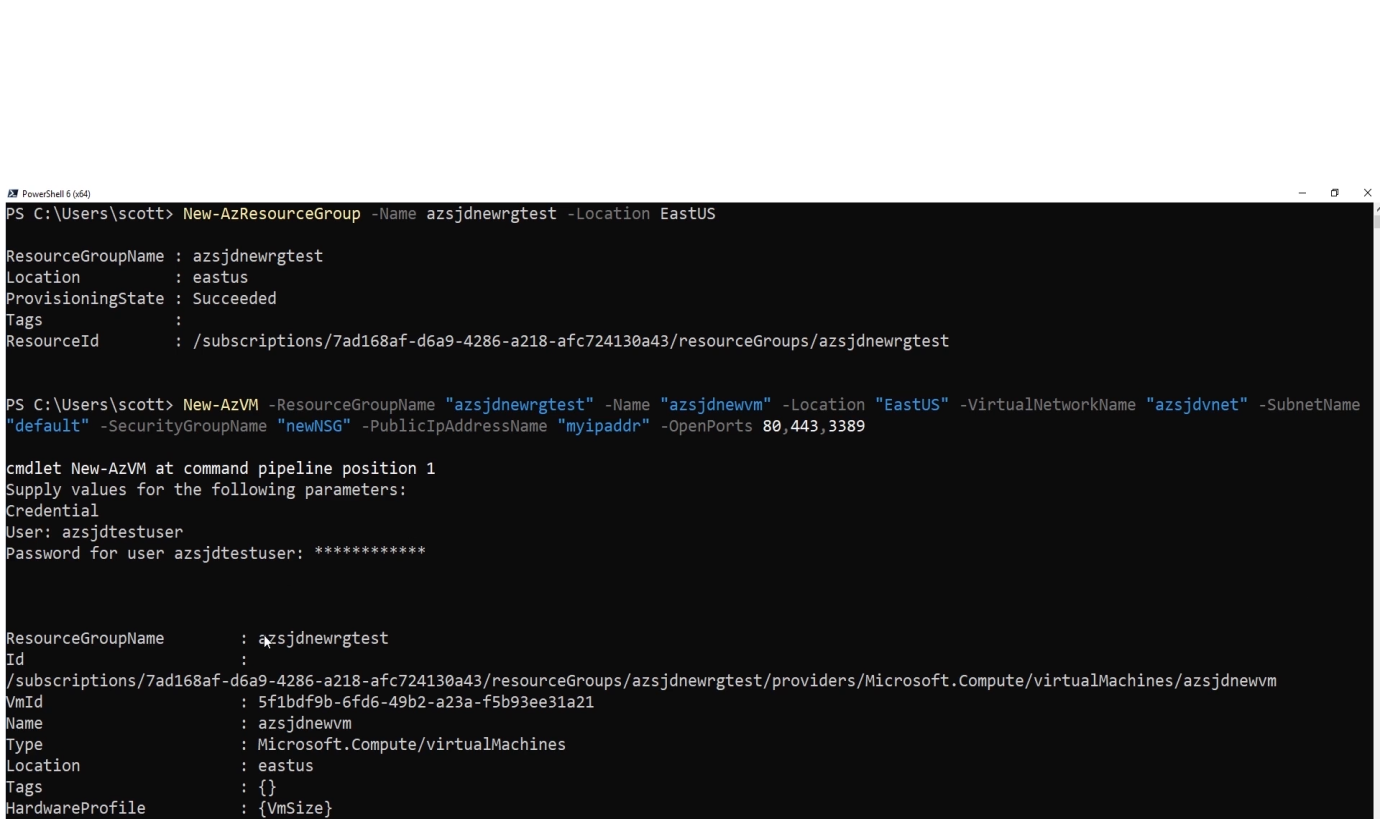
Create a VM in Power shell:
Start and Stop VM in Powershell:

Windows and Linux VMs
Modifying Existing ARM Template :
Azure Resource Management Module is used for Automatic VM Deployment
Go to Resource group> select VM> select Resource group>Deployment>View Template>Download.
You can modify the Json template parameter to create a new VM based on your requirement. Ex: change VM name, Public ip address, network interface. Once you make changes you can add the template by using Add to Library option.
Deploy Linux VM using ARM template :
az vm image list -- output table
Go to Resource group> select VM> select Resource group>Deployment>View Template>
Change the imageReference : Publisher “Redhat” & Offer “RHEL”
ARM Custom script Extension :
It is a post deployment action on your VM. If any script or application need to be installed on brand new VM post deployment., such action can be done automatically using Custom script extension.
Go to VM> Extensions> Add> Search “Custom Script Extension.”>Next>Browse the File (.sh) where you located >Review + Create
You can also install Software with custom script extension
Go to VM> Extensions> Add> Select the software > >Review + Create
Manage Azure VM :
Add Data disk to VM:
Azure provides default encrypted OS disk with 127GB . You cannot save application files on it. You need to create a data disk to store app files.
Go to VM> Disks> Under Data Disks> Create and Attach a new disk
Provide the necessary details: LUN – Default ,Disk Name,Storage type, Size ,Host Caching,
>Create
To Resize the Disk
Stop the VM> Go to Data Disk> Select theDisk> Under Settings>Size +Perfomrance>Select the Size and Performance tier >Resize
Add NIC Interface to VM :
Go to VM> Networking>Check the ip configuration
Go to VM resource group>Go to Vnet>Subnet>Add Subnet> Save
Now stop the VM and go to Networking>Attach Network Interface>Select the secondary interface>OK
Change VM Size: Go to VM>Size> Select the VM size >Resize
Redeploy a VM: In some cases ,based on client request you may have to redeploy VM. Ex: If RDP,SSH of the VM not connecting /working
Go to cloud shell > Pshell
Set-AzVM -ResourceGroup “ResourceGroup” -Name “VMName” -Redeploy

Go to VM >Check the VM status in overview
Ensure the VM is running >Click on Redeploy +Reapply
Select Redeploy>OK. The Redeploy will take VM offline and start the deployment process. It takes only few mins to complete. Once finished, the VM is running on a new host. The Activity Logs will show that the Redeploy ran and if it was successful.
Reapply : Reapplying your virtual machine’s state. This operation will rerun VM provisioning and help solve the VM failed state, in case when VM provisioning failed while executing a previous VM action.
Azure Disk Encryption:
Go to VM> Disks> Additional Settings>Disks to encrypt> Select the disk> Create a Key vault>Key >Version
Enable Access “Azure Disk Encryption for volume encryption” in access policy and create
Enabling the Azure Disk encryption require a VM reboot.
Manage VM Backups :
Enable backup for VM:
Goto VM> Backup> Create New> Fill in the details as default > Enable backup
Go to VM resource group> Backup Policies > Edit backup Policy and Update
VM Backup Jobs and restore:
Goto VM> Backup>View all jobs> Select the backup you want to restore > Click on 3 dots(…)at right most corner of the selected backup > Restore VM
To restore VM ,you need to create a new VM to restore backup. You may also restore or replace existing disk options to restore backup.
Azure App Services:
Azure web apps are built in application in Azure. In order to run the web app resources you need to create a app services plan.
Go to Create a resource> App Service plan>Create
Create a Web App: Go to Create a resource> Web app Service> Create>Fill in the tabs> Create>
Go to Webapp service >Click on the URL in the overview portal to check if it is working . You may able to access the page with “Your web app is running and waiting for your content”.
Go to Webapp service> Deployment Center>You can authorize the app such as Github,Bitbucket to deploy and build codes.
Go to Webapp service>Configuration>General settings> You can change the product versions>
Go to Webapp service>Custom Domain> Enable /Disable HTTPS connection
Go to Webapp service>Networking > Access restrictions> Whitelist Vendor IP to access the webapp service.
Scaling Web apps:
There are two types of scaling : Scaling up and Scaling down
You can scale up or scale down based on the response time of the App service plan.
Go to Webapp service>Scale up> Based on the Environment (Dev/ Prod) select the pricing tier and apply
Go to Webapp service>Scale Out >Confiure>Manual scaling > Increase the instance count up to 3>
Standard and Premium plan support Autoscaling feature upto 10 Instances. You can set auto scaling in Standard and Premium plan.
Go to Webapp service>Scale up>Autoscaling> Set the value of CPU threshold
Ex: If the CPU percentage is more than 80 % for 10 mins increase the no of instances
Go to Webapp service>Scale out>Autoscaling> Set the value of CPU threshold
Ex: If the CPU percentage is less than 15% for 10 mins decrease the no of instance being used.
Backup Web apps:
Go to Webapp service> >Backups > Configure> Apply
Under backup click on “Backup is not configured. Click here to configure backup for your app.”
Under Backup storage> Click on storage no configured>Create a Storage account with Standard Performance>OK
Click on storage account you created>+ Container>Private access>Create
Now you can schedule manual/Scheduled backup
Go to Webapp service> >Backups >Backup >it will initiate a backup
Schedule backup: Go to Webapp service> >Backups >Configure>Schedule >Schedule backup on>Apply the schedule
App Service Networking:
Go to Webapp service>Networking > Access restrictions> Add rule>Add ip address to allow /Deny access
Go to Webapp service>Networking> Outbound traffic>VNet Integration> Add VNet to allow private internal Microsoft communication.
Note :Vnet Integration only allow Private connection to the app service
Go to Webapp service>Networking>Inbound Traffic>App Assigned address>Enable Secure connection Protocol.
Azure Kubernetes Services (AKS):
Containers:
Containers are bundle of software packages with the related configuration files and libraries and with the dependencies required for the app to run. You can create a container in local machine and deploy container image to cloud (AWS ,Azure) .
To Create Docker Container:
Go to Create a resource >Create Web App>Instance Details>Publish*>Docker Container>Create
To Create Container Instance :
Azure Container Instances offers the fastest and simplest way to run a container in Azure, without having to provision any virtual machines and without having to adopt a higher-level service.
Go to Create a resource >Container Instance > Create
There are other containers available under >Crete a resource>Containers.
Create an AKS Clusters:
Go to Create a resource >Kubernetes Service> Create>Select Default Kubernetes version
Node Pools> Virtual node>Disable (No downtime)>Leave rest all tabs as default settings>Create
To install AKS:
Go to Azure Bash > az aks install-cli
>az aks get-credentials --resource group “Name” –name “Name”
Deploy a container to AKS:
Copy Azure-vote.yaml from the portal
Go to bash>kubectl apply –f azure-vote.yaml
>kubectl get nodes
>kubectl get service
Scaling Kubernetes:
Go to bash > kubectl get nodes
>kubectl get pods
>kubectl get –o wide
Autoscale: kubectl autoscale
Azure Container Instance (ACI):
The ACI is used to run the container directly on the azure public cloud without requiring the use of VM’s. The ACI’s are good for Dev, test or small application .It is not recommend for Production environment.
Go to Cre>ate a resource> Create a Container Instance>Fillup the necessary details>Create.
Manage Virtual Networking:
Create Virtual Network :
Go to Create a resource> Create a virtual network>Provide the private IP
Note: Anything starts with 10 is a private Ip address. Ex: 10.0.0.0/16
Add frond and backend Ip address along with default subnet
Ex :Front end :10.0.0.0/24 , Backend :10.0.1.0/24
Click on Review + Create
Create Public IP address:
Public IP addresses allow Internet resources to communicate inbound to Azure resources. Public IP addresses enable Azure resources to communicate to Internet and public-facing Azure services.
Go to Create a resource>Public IP address > Create with Default settings
Network Routing :
Azure automatically routes traffic between Azure subnets, virtual networks, and on-premises networks. If you want to change any of Azure's default routing, you do so by creating a route table.
Go to Create a resource>Route table> Create with Default settings
Goto Created route table>Routes>Add route>Provide backend ip
Subnets>Associate>Select virtual network>Subnet >backend
Create Azure Firewall:
Azure Firewall is a controlled security utility that defends your Azure Virtual Network resources. It comes with high availability and unlimited cloud scalability, Which means that you don’t have to deploy additional infrastructure for high availability like two firewalls or three firewalls and also no need for the load balancer. An important point to note here is that by default Azure Firewall blocks all the traffic.
Go to Create a resource>Firewall>Create>Availability zone> None>
IP address Ex: 10.0.5.0/24 ,subnet:10.0.5.0/25
Public ip address>Add new >with any name> Create
Configure firewall: Go to Create a resource >Route table> Create>
Goto Route table > Routes>Add with Ip address prefix>Next hop type Virtual appliance >Ok
Goto Route table >Subnets>Associate>Select Virtual network and Subnet>
Go to Create a resource>Firewall>Rules> Add rule>
NAT Rule
Network Rule
Application Rule
Network Rule : Firewall>Public Ip configuration>Copy the Ip address
Go to VM and copy Private Ip. Now Go to Firewall>Rules> NAT Rules>Set RDP rule
Source * , Destination Public ip addess , Translated address VM Private IP.
NAT Rule : You can allow /Deny DNS ,Protocol-UDP,Provide Source and destination IP, Port Number.
Application Rule: Firewall>Rules>Application rule>add rule to allow Microsoft network.
Source IP Address >VM Ip range, Protocol : HTTTP,HTTPS
Target FQDN :www.microsoft.com
Implement and Manage Virtual Networking :
VM from one VNet cannot communicate VM in another VNet. Storage account ,SQL DB can be accessed in another region,but VNet is a private end point which cannot be accessed.
VNet Peering :
VNet Peering connects two virtual networks for resource sharing in one region or across regions in Microsoft Azure.The cost may differ based on zone selection.
Go to VNet>Peering>add>Peering link name
Ex :Peering link names :Peering1to2 ,Peering2to1
Proceed with default settings> Add
Azure to Azure Virtual Network Gateway :
A VPN gateway is a specific type of virtual network gateway that is used to send encrypted traffic between an Azure virtual network and an on-premises location over the public Internet. You can also use a VPN gateway to send encrypted traffic between Azure virtual networks over the Microsoft network.
Goto VNet>Subnet>Gateway Subnet>Create with default settings
Go to create a resource>Virtual Network Gateway> Create with default settings> Create
Adding Network Gateway Connection :
Go to Virtual Network Gateway>Connections> Add>Create
Go to Virtual Network Gateway>Enable connection between Network gateways.
Configure Name Resolution :
There are 2 types of DNS in Azure:
Azure Default DNS
Azure Private DNS
Azure Default DNS : For Azure Default DNS does not require configuration . You can use hostname to connect to VM on same Vnet.
Azure Private DNS : Create a own custom domain names such as dev.local,staging.local,prod.local etc.
Create Private DNS Zone:
Private Zone : Setting up your Own Custom Domain.
Go to Home>Search DNS>
Click on Private DNS Zones > Create>Name(ex :dev.local)> Create
Go to Private DNS Created>Virtual Network Links>Enable Auto Registration
Go to Create a resource > Create VM1 > Select Private DNS Vnet> Create
Go to Create a resource > Create VM2 > Select Private DNS Vnet> Create
Got to Private DNS >Record Set>Custom name>VM1 IP>Ok
Got to Private DNS >Record Set>Custom name>VM2 IP>Ok
Enable Firewall between two servers Powershell Command :
New-NetFirewallRule –DisplayName "Allow ICMPv4-In" –Protocol ICMPv4
Create Public DNS :
Go to Home>Search DNS>DNS Zones> Create
Ensure the Domain Name is registered in the Domain register Ex:contoso.com
Go to DNS Zone you created will have 4 Name servers. Register all 4 servers in custom DNS in domain register.
Go to VM1> add IIS role and go to NSG of the VM1 >add inbound port rule >http
Go to VM resource group > Click on DNS zone created>Record Set>www> A type>Provide public IP of the web server>Ok
Secure Access to Virtual Network :
Network Security Group (NSG) :
The VM Will have the default NSG configured. To change the NSG
Go to VM> Virtual network/subnet>Under Connected device> Network Interface>Network Security Group>Change NSG from the drop down>Save
To Verify : Go to > Network Interface>Under support and troubleshooting>Effective Security rules
Go to VM > Select the unassigned NSG> Network interface (Check if any entries)>Subnets(Check if any Entries) > Check Connected Devices.
Delete NSG if no connected devices
Configure Load Balancing:
There are two types of load balancing in Azure :
Load Balancer (Level 4)
Application Gateway (Level 7)
Load Balancer (Level 4) : To distribute traffic/load from single source (app/service) to multiple destination servers. It is a rule based load balancer, it will assign the traffic based on 5 rules source ip /port ,destination ip/port and protocol. If one load balancer is failed /timeout it will send load to another server automatically.
Frontend IP configuration : You can assign another Public IP to the same load balancer if your VM has more than one application running.
Setup Load Balancer:
Before we create a Load balancer, Create three virtual machines in same availability set.
Go to Create a resource >Load Balancer>Create>Basic SKU>Pubic >Create a dynamic for frontend>Backend pools> add a backend pool>Virtual network>Virtual machines>IPv4>
Virtual machine> add> Select VM1 and Select the network Interface card>Add
Virtual machine> add> Select VM2 and Select the network Interface card>Add
Virtual machine> add> Select VM3 and Select the network Interface card>Add
Proceed with Default setting and create
Fill up healthprobe with below values for TCP connection
Open the Load Balancer> Health probe>Add>IPv4>TCP>80>5 sec>2>ok
Fill up healthprobe with below values for HTTP connection
Open the Load Balancer> Health probe>Add>IPv4>HTTP>/health.html>30 sec>2>ok

Trouble shooting a Load Balancer :
Goto Load Balancer>Frondend Ip configuration >Copy the IP and Check in URL.
Goto Load Balancer>Backendpools>Check VM status
Goto Load Balancer>Health Probe>Check Protocol
Goto Load Balancer>Load Balancing rules>Front end address
Goto Load Balancer>Inbound NAT Rules
Goto Load Balancer>Outbound Rules
Goto Load Balancer>Check the Graph in health probe
Creating Application Gateway:
Go to Create a resource >Application Gateway>Create>Standard tier
Enable Autoscaling :Yes ( To enable scaleup application Gateway)
Proceed with Default settings>Frontend>Public ip address
Backuend>Add Backend Pool>Backend pool without configuration
Configurations>Routing Rules>Rule name> Listener Name> Frontend Ip>
Backend Targets> Type>Backend pool>Backend Target name>HTTP>>80>
Additional Settings>Disable> Cookie-based affinity and Connection draining> Create
Monitor and Troubleshoot Virtual Networking:
Azure Monitor :
Azure monitor collects data from various sources such as applications, operating systems, Azure resources, etc. in the form of metrics and logs.
Go to All Services> Monitor>Networks>Check the network health status> Connectivity>Create a Connection monitor>Fill Basics tab>Testgroup>
Note: To add Source Azure end point ,Network Watcher must be installed on VM’s
>Create Alert>Review+Create
Network Watcher :
Network Watcher provides you the ability to diagnose your most common VPN Gateway and Connections issues and help further investigate.
Go to All Services>Network Watcher>Enable
>IP Flow Verify>Fill VM details> Give any IP and port as Remote IP address. You will get access allowed as the VM configured with NSG AllowAllInbound.

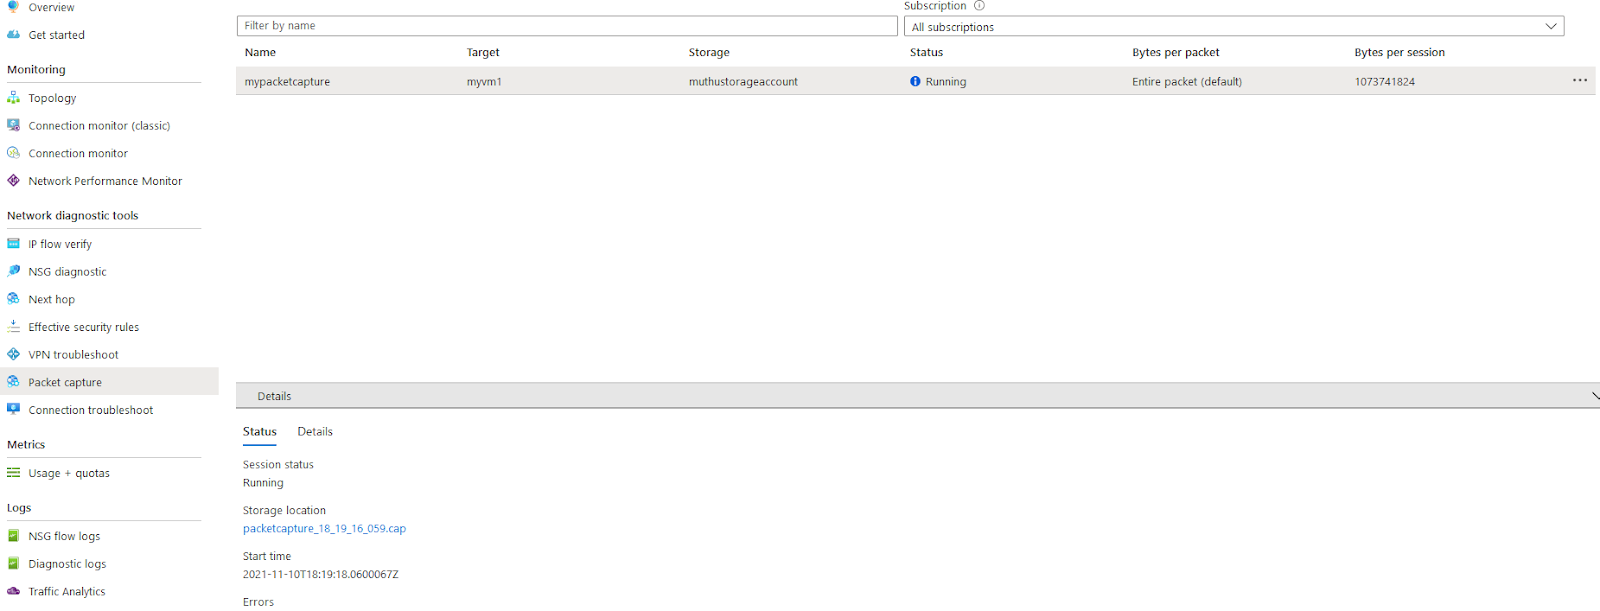
>Packet Capture>Add>Provide VM Details and Create with Default settings.
Monitor Resources by using Azure Monitor:
Overview of Azure Monitor :
Azure monitor is able to monitor the azure services such as App Services, Virtual machines,Storage accounts etc
Enabling Diagnostic for resources :
Go to Monitor> Diagnostic settings>Enable monitoring for the resource you want to.
Note :To enable Monitoring on VM , you need to install Azure monitoring agent on the guest OS.
Go to Monitor>Virtual Machines>Not Monitored>Enable will install /upgrade monitoring agent on the VM from Azure.
Running Basic Kusto Queries on Logs:
Go to Monitor>Logs>Select scope> Select azure built-in query and run the query.

All the best for your Exam!!


Comments
Post a Comment